Creating Weblogic Domain with SOA support.
This is the final post in continuation for the creation of the weblogic domain with the SOA support. In last two post I described component required and placement of the each artifact required for the creation of the SOA server. Now everything in place and we can start building a server which will support soa.
There are two ways a SOA server can be configured
1. All in one Admin server
2. Soa server as a managed server to Admin server.
In weblogic we can create a number of managed server under a admin server each of these managed server are like different serving point. In a cluster environment two or more managed server worked as a single unit, to increase availability. Each managed server can be controlled from Admin server and while startup it takes all the configuration related information from the Admin server.
While for the study purpose its better to have a all in one admin server which take less resource to run and require less steps to shutdown or start, which we must have to do with a experimental server.
Steps
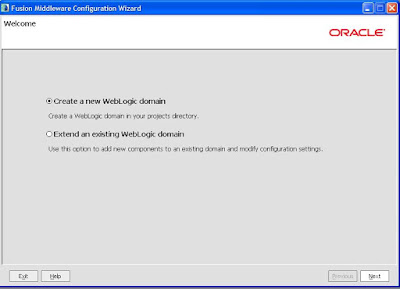
1. Welcome Screen
Start your database if not already started and go to the directory \Oracle_SOA1\common\bin and then double click on config.cmd for linux user .sh file.
It will start the configuration wizard. Select the create a new weblogic domain and then click next.
2. Select Domain Source
In second screen select oracle SOA suit, two more options will be selected automatically after this. Select oracle enterprise manager too with all the three options.
3. Specify Domain Name and Location
Choose a different name to your domain, or use default name.
4. Configure Administrator user name and Password
Choose a user name for the weblogic domain and password, this will be required everywhere so choose default weblogic and password weblogic1.
5. Configure JDBC component
Opt for default in the next screen and then click next. in the next screen change the database related information, you need to change password/host/port for the server. This is a little tricky screen you can change for the individual schema or can change for all while selecting all.
6. Test JDBC Component
Next screen will check all the schema availability and there version and will give error if anything is wrong. Click next.
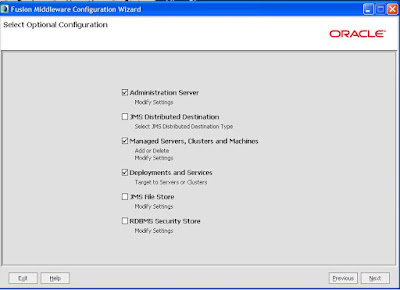
7. Select Optional configuration
Select Admin server, managed server cluster and machine and deployment and services. and then click next
8. Configure the Admin Server
Change the listen port if you want or opt for the default. I have opt for port 8800, click next.
9. Configure managed server
Here we are trying to create a Admin server, having support for soa so delete both the servers in this screen. Select one by one and then delete.
Once deleted screen will be look like this.
10. Configuring Cluster
We are not configuring any cluster as of now, we can use this screen if want to configure and cluster environment. Click next.
11. Configuring Machine
This by default select the machine on which executing wizard we can add another machine too if want use a number of machine for complete deployment. Leave default values as it is and then click next.
12. Assign servers to machine.
Select the server and on the right hand side select the machine and click on the arrow, after modification It will look like this, click next.
14. Target Deployment to Cluster or server
In this screen select all, and then click next
15. Configuration Summary
This is the last screen of the configuration, it a kinda information screen, you can take a screen shot for information purpose and then click create. It will start creation of the weblogic domain.
16. Creation Domain
It will create the domain and once finish you can click done button. This server will be created in the \user_projects\domains\ folder and and \user_projects\domains\weblogic_domain\bin directory will have the script to start and stop weblogic server.
Once you double click on the bat file it will start the server. you can view the server
http://HOST:PORT/console
http://HOST:PORT/em
both will have the user name and password same as we configured earlier.


Comments